File Permissions in Unix
In this blog post, you will learn:
- How to see file permissions on Unix systems
- How to read Unix file permissions
- How to modify Unix file permissions
Let’s get to it!
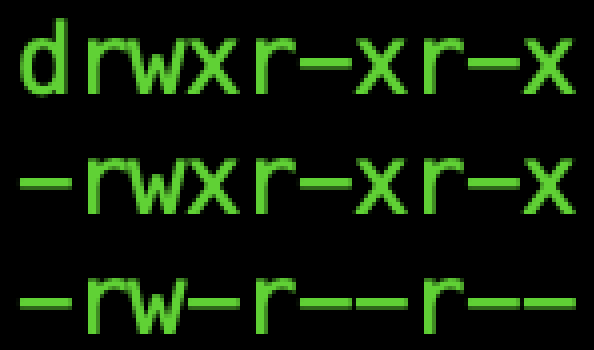
Have you ever seen something like this?

If you haven’t, not to worry. If you have and you haven’t known how to interpret what it means, that’s what we’re going to talk about today!
Viewing File Permissions#
If you haven’t seen this before, try opening Terminal and typing ls -l. If you’re unfamiliar with this command, ls is the Unix command for listing the files and directories in the current directory you’re in.
An extra trick: To see all files and directories in your current directory, add an -a flag. This can be combined with the -l flag like this: ls -la
Okay great! Now we know how to find and see file permissions.
Reading File Permissions#
So now you’re looking at something, with your own content, structured like this:
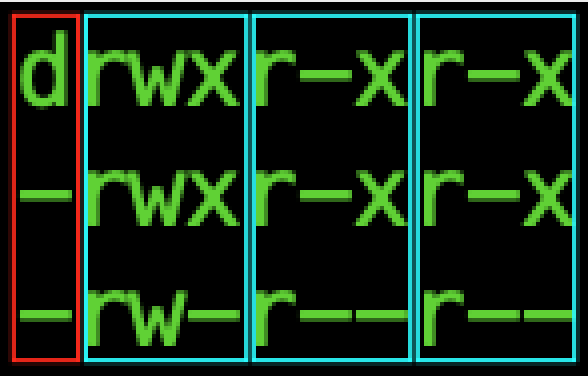
While this may seem like a string of random characters, we can actually break it down like this:
You may notice that there is some repetition with certain letters and letter placement. There is in fact a reason for this.
I’ve sectioned off the string into 4 parts. The first character has a unique purpose, while the other three have unique purposes but are structured the same way.
The first column, surrounded in red, is displaying the permissions of your current directory’s contents. There are two possible characters here:
- : A dash indicates that this is a file
- d : The letter d indicates that this is a directory
If you look back at the picture above, you can see that there is one directory listed followed by two files.
Okay, so what about the blue parts? We’ll start by talking about what the three letters inside the blue box mean, and then we’ll distinguish between the three blue boxes.
Each blue box emcompasses three letters. The same pattern holds for each blue box, hence why they’re all categorized the same way.
If the permission has been granted, then the letter will be displayed. In order, the permissions are read (r), write (w), and execute (x). If the permission has not been granted, then a dash will be displayed instead.
But what do those permissions mean? Just what you’d expect- read means you can read the file, write means you can write (make changes) to the file, and execute means you can execute the file.
If you’re asking yourself well, who is “you”?, then you’ve caught onto the differences between the three blue boxes. The first box refers to permissions of the user, or owner, of the file. Check this out:
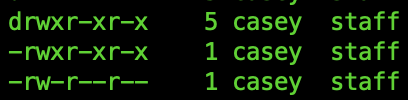
See how my name (casey) is listed after the permissions? That means I own the file, and therefore the first set of rwx permissions refers to what I can do with the file.
The next set declares what the file’s group can do. Take another look at our ls -l results:
The name after the file owner is the file group. You can see above that the group for each of the contents is listed as staff.
Lastly, we have the permissions for other, or everyone else.
Before we move on to how to change permission, let’s practice reading a set of permissions.
What is -rwxr–r– saying?
. .. … .. .
Okay, let’s see! The dash at the beginning means this is a file’s permissions. Next, we can see that the user has read, write, and execute permissions. Lastly, we see that only read permissions have been given to the group and anyone else.
Awesome work! Let’s look at how we can change who has what permissions.
Modifying File Permission#
What if we want to change the file’s permissions? If we have sudo privileges, we can do this.
There are actually two different formats you can use for changing permissions; one uses letters and the other uses numbers. In either case, we use the chmod command to make our changes.
If we want to use the letter format, we’ll use three characters that refer to who we’re changing the permission for, what we’re doing with the permission (granting or removing), and what permission we’re affecting. The following options exist:
- who: u is used for the user, g is used for the group, and o is used for other
- what we’re doing: + lets us grant a permission, - lets us remove a permission
- what permission: these are consistent with what we saw above- r for read, w for write, and x for execute
Example: Say we want to grant the group execute permissions. That command would look as follows: chmod g+x [file]. After calling the chmod command and specifying what permissions to change for who, we end with including what file we’re making the changes for.
If we want to use number format, that middle argument changes. The read, write, and execute permissions are all represented by different numbers. Read is represented by 4, write by 2, and execute by 1. The difference with this format is that you change the user, group, and other’s permissions at the same time. Each permission is represented by the toal of the permissions you want to grant. It’s easiest to see this in practice.
Example: Say we want to grant the user all permissions (read, write, and execute), grant the group read and execute permissions, and grant others execute permissions. That would look as follows: chmod 751 [file]. Since we gave the user all permissions, we added up 4, 2, and 1. Since we gave the group read and execute permissions, represented by 4 and 1 respectively, we used the number 5. Since others were given only execute permissions, that total was 1.
Let’s try two last examples, one using letters and one using numbers.
Problems:
- How would you grant others execute permissions? (with letters)
- How would you grant all permissions to the user, the group, and others? (with numbers)
Answers:
- chmod o+x [file]
- chmod 777 [file]
If you got them, great job! If not, don’t worry. Keep at it and it’ll click.
While we’re on the topic of chmod 777, we should note that you won’t want to use that command often. Providing write and execute permissions to anyone likely isn’t something that needs to or should be done.
Conclusion#
We made it! We now know how to view, read, and change file permissions in Unix. I hope this blog post helped you understand how file permissions work. Let me know if you’d like to see more posts like this.